Introduction : –
A Forward Proxy Server is a server that sits between you, aka client, and your remote server. Lets put it in a simple way 🙂
Let’s say you want to access Facebook from your laptop using your favorite browser. Your browser is the client here. Facebook obviously runs on a server 😉 Now, all HTTP requests made from your browser to Facebook will contain your laptop’s IP address as well. But you don’t want your IP address to be tracked. What you will do now?
Yes, the answer is setting up a Forward Proxy Server. This proxy server will sit between you & Facebook server. Whatever HTTP requests your browser will initiate will be relayed/proxied via this proxy server. Data packets flow like this. Your laptop –> proxy server –> Facebook server.
It means Facebook will see that the request came from the proxy server & it will never know that it actually originated from your laptop.
It is just a simple explanation of Forward Proxy Server. There are many other uses & explanations. But I tend to keep things simple 😉
Lab Description : –
- Forward Proxy Server – An Ubuntu 14.04 Server running Apache with IP 192.168.0.62
- Client – An Ubuntu 14.04 Server with IP 192.168.0.51
- Remote Server : – An Ubuntu 14.04 Server with IP 192.168.0.50. This server runs Jenkins so I will be accessing Jenkins from my client via the proxy server.
Steps to Perform : –
Configure Forward Proxy Server.
1. Install core product.
Install Apache, if not already done. It is as simple as issuing –
root@shashank-forward-proxy-server:/home/shashank# apt-get install-y apache2 apache2-doc apache2-utils
2. Install the necessary modules.
Issue below command to install modules required for proxy server.
root@shashank-forward-proxy-server:/home/shashank# apt-get install libapache2-mod-proxy-html libxml2-dev
3. Enable Apache modules.
Issue below command to enable all the required Apache modules.
root@shashank-forward-proxy-server:/home/shashank# a2enmod proxy proxy_ajp proxy_http rewrite deflate headers proxy_balancer proxy_connect proxy_html
4. Configure proxy configuration file.
We will now create an Apache proxy configuration file that will hold information required for proxying. Start with creating a file like this.
root@shashank-forward-proxy-server:/home/shashank# vim /etc/apache2/mods-available/proxy.conf
Please check my GitHub gist to see the contents of this file. HTML tags are interfering with the tags in the configuration file. You can see that nothing much is happening here except enabling the proxy.
5. Define port for proxy server.
Now we need to define the port on which our proxy server must run. Issue this command after backing up the original file.
root@shashank-forward-proxy-server:/home/shashank# sed -i -e 's/80/8889/g' /etc/apache2/ports.conf
You can see that I have replaced default port 80 with 8889. Choose any port that you like & is available.
6. Define a Virtual Host.
It is now time to define a Virtual Host which is a separate instance of your web-server(remember you can host multiple sites on a single Apache server). We are defining it to enable more fine-grained logs & port. Start with backing up the original default Virtual Host.
root@shashank-forward-proxy-server:/home/shashank# cp -p /etc/apache2/sites-enabled/000-default.conf /etc/apache2/sites-enabled/000-default.conf.orig
Now edit this /etc/apache2/sites-enabled/000-default.conf file to define logs location & the port. Here, I am running it on the same port 8889 as this is my only instance.
Please check my GitHub gist to see the contents of this file.
As you can see, we have defined the location for logs specific to the proxy server.
7. Enable the Virtual Host.
Time to enable our newly created Virtual Host.
root@shashank-forward-proxy-server:/home/shashank# a2ensite 000-default.conf
8. Restart Apache.
Configuration is now complete & we must restart Apache to load these new settings.
root@shashank-forward-proxy-server:/home/shashank# service apache2 restart
 * Restarting web server apache2 [Fri Jun 23 09:09:32.982307 2017] [proxy_html:notice] [pid 2940:tid 140143966525312] AH01425: I18n support in mod_proxy_html requires mod_xml2enc. Without it, non-ASCII characters in proxied pages are likely to display incorrectly.
AH00558: apache2: Could not reliably determine the server's fully qualified domain name, using node2.shashank.com. Set the 'ServerName' directive globally to suppress this message
With a success message, you are confident that your Apache configuration is correct 🙂 Above is just a warning & not an error, so no need to worry 😉
Let us move on to client-side configuration.
Client Side Configuration : –
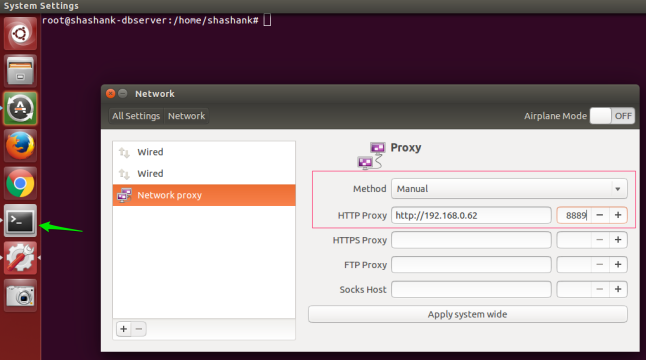
With a working Apache Forward Proxy Server configuration, let us move on to our client machine & configure it to use our proxy server. For this, log-in to the machine & go to System Settings. Then select Network & then Proxy.
Enter your HTTP proxy server IP or FQDN or hostname & the port. Remember we configured our proxy server to run on port 8889.
Test your proxy connections.
You are all set now 🙂 Time to test the settings. Lets now open our browser & try to access Facebook & also Jenkins on a remote server (IP 192.168.0.50. See Introduction) in the same network. If your configuration is correct, you will be able to browse Facebook or the internet without any issue. You will also be able to access your Jenkins server. You can check your proxy in action in below logs. Remember we had configured log location in step # 6 above. You need to log-in to your proxy server & check the log file which happens to be /var/log/apache2/access_forward_proxy.log . If your location is different, make sure you check that file.
You can see that requests made from client 192.168.0.51 to remote server 192.168.0.50 are proxying through our proxy server.
192.168.0.51 - - [23/Jun/2017:09:33:17 +0530] "GET http://192.168.0.50:8080/static/50cbf35e/images/16x16/warning.png HTTP/1.1" 200 761 "http://192.168.0.50:8080/static/50cbf35e/css/style.css" "Mozilla/5.0 (X11; Linux x86_64) AppleWebKit/537.36 (KHTML, like Gecko) Chrome/59.0.3071.86 Safari/537.36"
192.168.0.51 - - [23/Jun/2017:09:33:17 +0530] "GET http://192.168.0.50:8080/static/50cbf35e/images/16x16/error.png HTTP/1.1" 200 817 "http://192.168.0.50:8080/static/50cbf35e/css/style.css" "Mozilla/5.0 (X11; Linux x86_64) AppleWebKit/537.36 (KHTML, like Gecko) Chrome/59.0.3071.86 Safari/537.36"
192.168.0.51 - - [23/Jun/2017:09:33:17 +0530] "GET http://192.168.0.50:8080/static/50cbf35e/images/top-sticker-bottom-edge.png HTTP/1.1" 200 605 "http://192.168.0.50:8080/static/50cbf35e/css/style.css" "Mozilla/5.0 (X11; Linux x86_64) AppleWebKit/537.36 (KHTML, like Gecko) Chrome/59.0.3071.86 Safari/537.36"
192.168.0.51 - - [23/Jun/2017:09:33:03 +0530] "CONNECT fonts.gstatic.com:443 HTTP/1.1" 200 4806 "-" "Mozilla/5.0 (X11; Linux x86_64) AppleWebKit/537.36 (KHTML, like Gecko) Chrome/59.0.3071.86 Safari/537.36"
192.168.0.51 - - [23/Jun/2017:09:33:17 +0530] "GET http://192.168.0.50:8080/opensearch.xml HTTP/1.1" 200 6997 "-" "Mozilla/5.0 (X11; Linux x86_64) AppleWebKit/537.36 (KHTML, like Gecko) Chrome/59.0.3071.86 Safari/537.36"
I hope you found this post interesting, informative & easy 🙂 Do let me know if it needs improvements or you have suggestions 🙂

Awesome! Thank you! Step 2 needs updating due to package evolution, but still works. Just spun up an Ubuntu Server 18 VM and ran through your steps with relative ease.
LikeLiked by 1 person
Thank you so much for your comment 🙂 I am really glad you found the post useful. Also, thanks for your suggestion. I will check that.
LikeLike