In my previous 2 posts, I had shown you how to setup Cacti monitoring server & configure it to monitor Linux client machines. In this post, I will explain to you how to install & setup Zabbix monitoring server on Linux. This post will be 1st half of this series. In 2nd post, I will explain how to configure Zabbix server & agents(clients).
Zabbix is an agent-based(Zabbix agent is to be installed on all nodes that we wish to monitor) server Monitoring & alerting tool available for a variety of OS. Unlike Cacti, Zabbix can also notify you of incidents/errors through Email, SMS & Jabber. You can customize when would you like to receive alerts. And of course, you would need a mail server to receive alert emails. Much like Cacti, Zabbix is also PHP-Apache-MySQl based application & plots graphs using the data stored in its MySQL database.
Let’s begin this step-by-step tutorial now 🙂
Install required packages.
I am listing a few pre-required packages below. If there is something missing, then Zabbix will show that at the time of Zabbix front-end installation. Make sure all components are installed for PHP & MySQL.
php
mysql
httpd
net-snmp.x86_64
net-snmp-devel.x86_64
net-snmp-utils.x86_64
Start the respective services & make sure to enable them to start at boot-up.
Create the zabbix group & user.
Issue below commands to get this done.
[root@server zabbix]#groupadd zabbix
[root@server zabbix]#useradd -g zabbix zabbix
Download Zabbix.
Download it from Zabbix official website. This tutorial explains installing using source code. So, download the source tarball & copy it to any location of your choice. Now unpack it. In my setup, its /shashank/zabbix.
[root@server zabbix]# tar -xf zabbix-2.4.6rc1.tar.gz
Then go inside the unpacked directory.
[root@server ~]# cd /shashank/zabbix/zabbix-2.4.6rc1
Now issue below command to configure its installer. You might run into a few errors related to libcurl & libxml
[root@server zabbix]# ./configure --enable-server --enable-agent --with-mysql --with-net-snmp --with-libcurl --with libxml2
If you run into errors related to libcurl & libxml, then install libxml2-devel.x86_64 & libcurl-devel.x86_64 packages & re-issue above command. It will be successfully configured now 🙂
Install Zabbix.
Now that installer is ready, its time to install it. Just issue make install & go have a cup of coffee or something to eat 😉 Its quite time-taking step 🙂
Create Zabbix database & its database user.
Time to setup database for Zabbix. For this, log in to MySQL as root & issue below queries.
[root@server ~]# mysql -uroot -p
mysql> create database zabbix character set utf8 collate utf8_bin;
mysql> grant all privileges on zabbix.* to zabbix@localhost identified by '';
mysql> quit;
Let’s populate Zabbix database with pre-defined SQL scripts. Exit from MySQL prompt & issue below commands on the shell.
[root@server ~]# mysql -uzabbix -p zabbix < database/mysql/schema.sql
[root@server ~]# mysql -uzabbix -p zabbix < database/mysql/images.sql
[root@server ~]# mysql -uzabbix -p zabbix < database/mysql/data.sql
A note about Zabbix agent : – Zabbix agent is a package/service that is used to send data to Zabbix server. If we need Zabbix server to monitor itself, the agent needs to be enabled on the server as well(that’s why I enabled it while configuring).
Copy PHP scripts to Apache Document Root.
Create zabbix directory in your Apache’s Document Root & then copy Zabbix PHP scripts to it.
[root@server zabbix]# cp -r /shashank/zabbix/zabbix-2.4.6rc1/frontends/php/* /var/www/html/zabbix
Edit configuration files.
For some reason, I needed to edit 2 configuration files for both server & agent. One, where Zabbix was unpacked & two, where Zabbix was installed(usr/local/etc).
[root@server php]# locate zabbix_agentd.conf
/shashank/zabbix/zabbix-2.4.6rc1/conf/zabbix_agentd.conf
/usr/local/etc/zabbix_agentd.conf
[root@server php]# locate zabbix_server.conf
/shashank/zabbix/zabbix-2.4.6rc1/conf/zabbix_server.conf
/usr/local/etc/zabbix_server.conf
So edit these 2 files with required information. zabbix_server.conf holds database information. Most of the values are commented out. Just uncomment the DBPassword line & enter the password. The values mentioned here will be used while installing Zabbix front-end.
zabbix_agentd.conf file defines the hostname/IP address of Zabbix server to be used. In our example, currently, Zabbix server is monitoring itself. So, mention the hostname & IP address of Zabbix server here.
Below are the contents of my conf files.
Server Configuration File.
### Option: DBName
# Database name.
# For SQLite3 path to database file must be provided. DBUser and DBPassword are ignored.
#
# Mandatory: yes
# Default:
# DBName=

DBName=zabbix

### Option: DBSchema
# Schema name. Used for IBM DB2 and PostgreSQL.
#
# Mandatory: no
# Default:
# DBSchema=

### Option: DBUser
# Database user. Ignored for SQLite.
#
# Mandatory: no
# Default:
# DBUser=

DBUser=zabbix

### Option: DBPassword
# Database password. Ignored for SQLite.
# Comment this line if no password is used.
#
# Mandatory: no
# Default:
DBPassword=zabbix
Agent Configuration File.
### Option: Server
# List of comma delimited IP addresses (or hostnames) of Zabbix servers.
# Incoming connections will be accepted only from the hosts listed here.
# If IPv6 support is enabled then '127.0.0.1', '::127.0.0.1', '::ffff:127.0.0.1' are treated equally.
#
# Mandatory: no
# Default:
# Server=

Server=192.168.0.123

### Option: Hostname
# Unique, case sensitive hostname.
# Required for active checks and must match hostname as configured on the server.
# Value is acquired from HostnameItem if undefined.
#
# Mandatory: no
# Default:
# Hostname=

Hostname=server
Start Zabbix server & its agent.
Just issue zabbix_server & zabbix_agentd commands to start it.
Install Zabbix web front-end.
Follow below instructions to install Zabbix front-end.
Disable your SELinux by issuing setenforce 0 command. Then, point your browser to localhost/zabbix. You will see below screen. Click Next now.


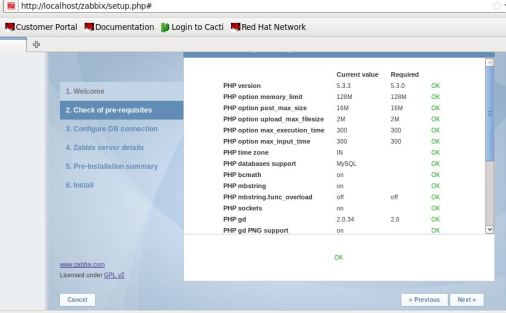
At this step, you will most probably see errors (Fail in red) on the installation screen. Some of these errors is due to incorrect settings in /etc/php.ini file. Just click the error links to find out what to modify & then edit/etc/php.ini file to fix the issues. For some reasons, I wasn’t able to setup Zabbix correctly using IST timezone in/etc/php.ini.
So, I set date.timezone = GMT. Other errors are due to missing PHP modules. If you see gd, bcmath, xmlreader/writer/ mbstring errors, then install bcmath & mbstring rpm packages. I have downloaded these packages from the internet. They were not found in my YUM repository. Make sure to choose/search for rpm files relevant to your PHP version. In my case, it was PHP 5.3.3-3.el6_1.3.
xmlreader/writer modules are available as YUM packages. Just do a yum install php-xml.x86_64 -y & yum install php-gd.x86_64 -y.
Now click Retry button after restarting httpd service. You will see all the required fields in green & you can move forward to install Zabbix front-end. Just follow the instructions 🙂
Issues fixed.
Make sure to use the same details as in zabbix_agentd.conf file for the database.
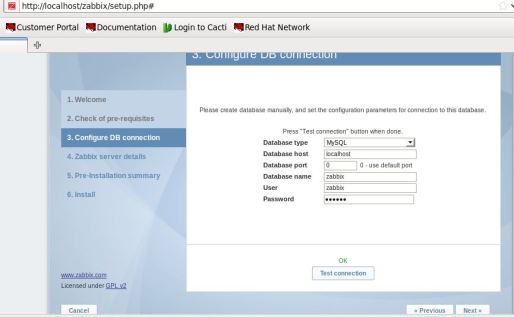
Leave it as it is.


If it says Fail, Download the configuration file & place it at the location mentioned.

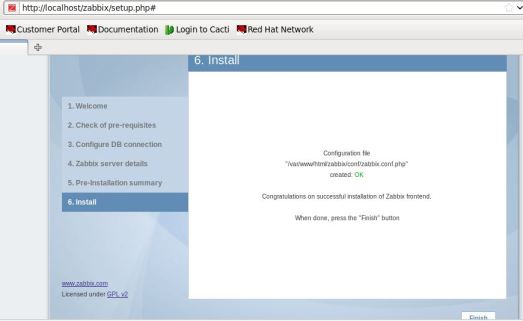
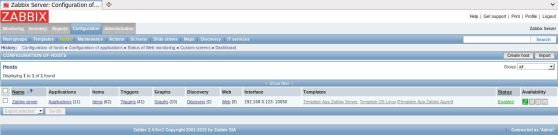
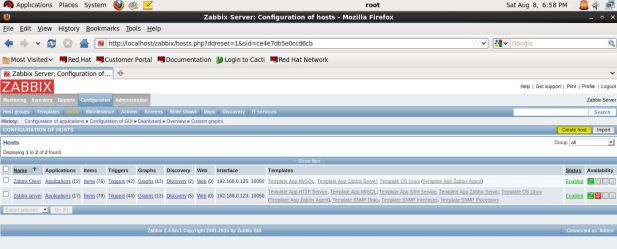
Login with credentials Admin/zabbix.

Congratulations!!! Zabbix has been installed & setup successfully 🙂

That’s all for this post 🙂 Zabbix is up & running fine. In the next post of this tutorial, I will explain how to configure Zabbix agent to start monitoring Linux client nodes.
Till then, see you 🙂