Aside

Using Git to manage configuration files & leverage the power of Version Control.


Git for SysAdmins

Introduction : –

Git is used by millions of Software Developers across the globe to manage their code (this post is not about an introduction to Git). While it is a “must have” tool for the Software Developers/Coders, Git can also be a valuable tool for SysAdmins or non-programmers who constantly make changes to various configuration files. A more traditional way to manage configuration files is to take a backup first by appending .bkp or .orig or .date to the file-names. But things can get really complex when there are frequent edits to the files & it can be quite confusing if we have to revert to a particular edit.

We, the SysAdmins, can leverage the power of Git or Version Control to manage our configuration files so that we don’t have to mess with backing up or renaming of the files.

Lab Description : –

To show you how we can use Git to manage the configuration files, I am editing an Apache Reverse Proxy configuration file on the Mac.

So I have created a directory GitConf where I have stored my apache-reverse.proxy.conf file, which I am going to manage using Git without keeping multiple, redundant copies.

root@shashank-mbp /U/a/D/GitConf# ls
apache-reverse.proxy.conf
root@shashank-mbp /U/a/D/GitConf# git --version
git version 2.8.1

Configure Git.

We now have to add our full name & email address to Git so that every commit is associated with the proper identity of the person who is editing the file.

root@shashank-mbp /U/a/D/GitConf# git config --global user.name "Shashank Srivastava"
root@shashank-mbp /U/a/D/GitConf# git config --global user.email your-email-address

Initialise the Git repository.

The next step after configuring Git is to initialise a Git repo which will store & track all the changes made to the file.

root@shashank-mbp /U/a/D/GitConf# git init
Initialized empty Git repository in /Users/admin/Downloads/GitConf/.git/

Add the file to Git.

Now add the apache-reverse.proxy.conf file to version control to start tracking the changes.

root@shashank-mbp /U/a/D/GitConf# git add apache-reverse.proxy.conf
root@shashank-mbp /U/a/D/GitConf# git commit -am "Add apache-reverse.proxy.conf file."
[master (root-commit) e9f5902] Add apache-reverse.proxy.conf file.
1 file changed, 38 insertions(+)
create mode 100644 apache-reverse.proxy.conf
root@shashank-mbp /U/a/D/GitConf# git status
On branch master
nothing to commit, working directory clean

Edit the file.

Now edit the file to see how Git monitors the changes. For this demo, I removed all the comments from my configuration file. Then I issued git status command. This command will tell us that Git has noticed a modified file.

root@shashank-mbp /U/a/D/GitConf# git status
 On branch master
 Changes not staged for commit:
 (use "git add ..." to update what will be committed)
 (use "git checkout -- ..." to discard changes in working directory)

modified: apache-reverse.proxy.conf

no changes added to commit (use "git add" and/or "git commit -a")

Commit the change to the repo.

Now I registered the change to my repository or repo. The key here is to include a meaningful commit message so that it clearly tells you about the change you have made.

root@shashank-mbp /U/a/D/GitConf# git commit -am "Remove unnecessary commits to make conf file more readable."
 [master 8ce9afc] Remove unnecessary commits to make conf file more readable.
 1 file changed, 1 insertion(+), 17 deletions(-)

Check Git log to see the commit history.

Now it is the time for us to check the commit history. Issue git log --oneline command & it will show you the history.

root@shashank-mbp /U/a/D/GitConf# git log --oneline
 8ce9afc Remove unnecessary commits to make conf file more readable.
 e9f5902 Add apache-reverse.proxy.conf file.

You can see here that there are 2 commits in the history.

Edit the file again.

I edited the file again & committed the change to my repo. You can see that I gave a clear & meaningful commit message.

I then made a few more changes & pushed the commits.

root@shashank-mbp /U/a/D/GitConf# git commit -am "Change the backend server port."
 [master f2a7201] Change the backend server port.
 1 file changed, 2 insertions(+), 2 deletions(-)
 root@shashank-mbp /U/a/D/GitConf# git log --oneline
 f2a7201 Change the backend server port.
 8ce9afc Remove unnecessary commits to make conf file more readable.
 e9f5902 Add apache-reverse.proxy.conf file.
 root@shashank-mbp /U/a/D/GitConf# git commit -am "Change the backend server port again."
 [master 54e7af8] Change the backend server port again.
 1 file changed, 1 insertion(+), 1 deletion(-)
 root@shashank-mbp /U/a/D/GitConf# git log --oneline
 54e7af8 Change the backend server port again.
 f2a7201 Change the backend server port.
 8ce9afc Remove unnecessary commits to make conf file more readable.
 e9f5902 Add apache-reverse.proxy.conf file.
 root@shashank-mbp /U/a/D/GitConf# git commit -am "Modify the absolute URL for backend server."
 [master f750197] Modify the absolute URL for backend server.
 1 file changed, 1 insertion(+), 1 deletion(-)
 root@shashank-mbp /U/a/D/GitConf# git log --oneline
 f750197 Modify the absolute URL for backend server.
 54e7af8 Change the backend server port again.
 f2a7201 Change the backend server port.
 8ce9afc Remove unnecessary commits to make conf file more readable.
 e9f5902 Add apache-reverse.proxy.conf file.
 root@shashank-mbp /U/a/D/GitConf# git commit -am "Replace Apache ServerName property with the actual hostname. Was previously set to IP address."
 [master ecc4a22] Replace Apache ServerName property with the actual hostname. Was previously set to IP address.
 1 file changed, 1 insertion(+), 1 deletion(-)
 root@shashank-mbp /U/a/D/GitConf# git log --oneline
 ecc4a22 Replace Apache ServerName property with the actual hostname. Was previously set to IP address.
 f750197 Modify the absolute URL for backend server.
 54e7af8 Change the backend server port again.
 f2a7201 Change the backend server port.
 8ce9afc Remove unnecessary commits to make conf file more readable.
 e9f5902 Add apache-reverse.proxy.conf file.

Undoing changes in Git.

At this point, I have 6 commits to my file. Now suppose my Reverse Proxy is not working any more because of my last commit which is ecc4a22. The description of this commit says : –

ecc4a22 Replace Apache ServerName property with the actual hostname. Was previously set to IP address.

It means when I changed the ServerName property, the Reverse Proxy stopped working. So, I need to undo this changes. For this, I will use git revert HEAD command.

HEAD means the last commit. So, git revert HEAD essentially reverts/nullifies the last change that was made to the file.

root@shashank-mbp /U/a/D/GitConf# git revert HEAD
[master c5c6c2d] Revert "Replace Apache ServerName property with the actual hostname. Was previously set to IP address."
 1 file changed, 1 insertion(+), 1 deletion(-)

Revert "Replace Apache ServerName property with the actual hostname. Was previously set to IP address."

This reverts commit ecc4a2241bcf87a0afd736d3e555c2e677e7f1e3.

# Please enter the commit message for your changes. Lines starting
 # with '#' will be ignored, and an empty message aborts the commit.
 # On branch master
 # Changes to be committed:
 # modified: apache-reverse.proxy.conf

You can see that the ServerName property is now set to the IP address again.

ServerName 192.168.0.62

One more edit/commit.

I was then asked to use the new SSL key & certificate for my Reverse Proxy server as the existing certificate had expired. So, I edited the file to include the new SSL keys & certificates. Then I committed this change to the repository as well.

root@shashank-mbp /U/a/D/GitConf# git commit -am "Use new SSL keys & certificates."
 [master e4e3124] Use new SSL keys & certificates.
 1 file changed, 2 insertions(+), 2 deletions(-)
 root@shashank-mbp /U/a/D/GitConf# git log --oneline
 e4e3124 Use new SSL keys & certificates.
 c5c6c2d Revert "Replace Apache ServerName property with the actual hostname. Was previously set to IP address."
 ecc4a22 Replace Apache ServerName property with the actual hostname. Was previously set to IP address.
 f750197 Modify the absolute URL for backend server.
 54e7af8 Change the backend server port again.
 f2a7201 Change the backend server port.
 8ce9afc Remove unnecessary commits to make conf file more readable.
 e9f5902 Add apache-reverse.proxy.conf file.

So, you can see here that the configuration file points to the new SSL key & the certificate.

SSLCertificateFile /home/shashank/ssl/ca-new.crt
SSLCertificateKeyFile /home/shashank/ssl/ca-new.key

BUT, when I restarted my Apache daemon, I noticed that the new certificate is not valid! So I decided to revert the change. I have 3 options now.

    1. Use git revert HEAD
    2. Use git checkout c5c6c2d
    3. Use git reset --hard c5c6c2d


Point # 1 has already been discussed so we will explore other options now.

git checkout c5c6c2d

Now, I have an option to check out the commit c5c6c2d which takes me to the point when I had my reverted the change in which I replaced IP address with the hostname. In other words, my configuration file now points to the old SSL Key & certificate & also the ServerName property is set to the IP address.

root@shashank-mbp /U/a/D/GitConf# git checkout c5c6c2d
 Note: checking out 'c5c6c2d'.

You are in 'detached HEAD' state. You can look around, make experimental
 changes and commit them, and you can discard any commits you make in this
 state without impacting any branches by performing another checkout.

If you want to create a new branch to retain commits you create, you may
 do so (now or later) by using -b with the checkout command again. Example:

git checkout -b

HEAD is now at c5c6c2d... Revert "Replace Apache ServerName property with the actual hostname. Was previously set to IP address."

Checking out puts the repository in a detached HEAD state which means there is no any branch where we are working. We can freely make changes to the file & commit those changes. You can see below that the configuration file now contains the reference to the old, working SSL key & certificate.

SSLCertificateFile /home/shashank/ssl/ca.crt
SSLCertificateKeyFile /home/shashank/ssl/ca.key

One thing worth noting here is that the changes committed in the detached HEAD state are not monitored & Git’s garbage control will delete any such commits as per its schedule. So here is the trick! We can create a new branch now where these commits can be stored permanently. It is also a good way to segregate the environments. For example, we can create a branch prod which will contain the working configuration file, ready to be used in Production. It will be a separate branch & we can tweak the file as per our liking. You can see below that the commit history of this branch no longer contains the reference to the commit e4e3124.

root@shashank-mbp /U/a/D/GitConf# git checkout -b prod
 Switched to a new branch 'prod'
root@shashank-mbp /U/a/D/GitConf# git log --oneline
 c5c6c2d Revert "Replace Apache ServerName property with the actual hostname. Was previously set to IP address."
 ecc4a22 Replace Apache ServerName property with the actual hostname. Was previously set to IP address.
 f750197 Modify the absolute URL for backend server.
 54e7af8 Change the backend server port again.
 f2a7201 Change the backend server port.
 8ce9afc Remove unnecessary commits to make conf file more readable.
 e9f5902 Add apache-reverse.proxy.conf file.

One thing worth remembering is that you still have all the commits in your master branch. You can go back to the master branch by issuing git checkout master command. But this command will take you back to the last commit e4e3124 which had broken the Apache configuration.

git reset –hard c5c6c2d

Another approach to go back to any commit in the repository is to use git reset.

git reset command changes your repository state to the commit you specify. See below how I have used git reset to change my repository state to the commit c5c6c2d. This commit contains the working configuration file.

root@shashank-mbp /U/a/D/GitConf# git reset --hard c5c6c2d
 HEAD is now at c5c6c2d Revert "Replace Apache ServerName property with the actual hostname. Was previously set to IP address."
 root@shashank-mbp /U/a/D/GitConf# git log --oneline
 c5c6c2d Revert "Replace Apache ServerName property with the actual hostname. Was previously set to IP address."
 ecc4a22 Replace Apache ServerName property with the actual hostname. Was previously set to IP address.
 f750197 Modify the absolute URL for backend server.
 54e7af8 Change the backend server port again.
 f2a7201 Change the backend server port.
 8ce9afc Remove unnecessary commits to make conf file more readable.
 e9f5902 Add apache-reverse.proxy.conf file.

All the commits in the master branch after c5c6c2d will vanish & you can continue to edit the file as & when required.

See the edits.

To see the changes you have made in the file or compare the changes between various commits, you can use git diff command. For example, let’s check what commits we currently have in our branch.

root@shashank-mbp /U/a/D/GitConf# git log --oneline
c5c6c2d Revert "Replace Apache ServerName property with the actual hostname. Was previously set to IP address."
ecc4a22 Replace Apache ServerName property with the actual hostname. Was previously set to IP address.
f750197 Modify the absolute URL for backend server.
54e7af8 Change the backend server port again.
f2a7201 Change the backend server port.
8ce9afc Remove unnecessary commits to make conf file more readable.
e9f5902 Add apache-reverse.proxy.conf file.

Now, I want to see what change I had made between the last commit & ecc4a22. So I will issue this command.

root@shashank-mbp /U/a/D/GitConf# git diff ecc4a22
diff --git a/apache-reverse.proxy.conf b/apache-reverse.proxy.conf
index 3166121..e39791f 100644
--- a/apache-reverse.proxy.conf
+++ b/apache-reverse.proxy.conf
@@ -1,5 +1,5 @@
 
- ServerName reverse-proxy-server
+ ServerName 192.168.0.62
 AllowEncodedSlashes On
 ProxyPreserveHost On
 ProxyPass / http://192.168.0.68:8080

You can see that the difference between the two commits is that ServerName property was modified.

That’s all for this post 🙂 I hope you find the post informative & useful. If there are any suggestions, please let me know through your comments 🙂
Integrate Linux (RHEL/CentOS) Servers With Windows Active Directory Through Command Line


Introduction

There are times when you need to integrate your Linux servers with Active Directory so as to allow authentication from that along-with local authentication. What it essentially means is that not only can you log in locally to this Linux server, you can also create users on your Active Directory & login with those users here as well.

This post explains how you can integrate your CentOS 7 server with Active Directory. Let’s get started 🙂

Lab Description : –

Domain Controller : – A Windows 2012 Server running with IP 192.168.0.10 & FQDN ad1.shashank.local.

Client machine : – A CentOS 7 server with the IP 192.168.0.65.

Active Directory Domain : – shashank

Client Configuration : –

Install necessary packages.

root@centos-server /h/shashank# yum install samba-winbind samba-winbind-clients pam_krb5 nscd

Configure DNS Server.

Edit your /etc/resolv.conf & add a line for your Domain Controller.

nameserver 192.168.0.10

Check connectivity for the Domain Controller.

root@centos-server /h/shashank# nslookup ad1.shashank.local
Server: 192.168.0.10
Address: 192.168.0.10#53

Name:ad1.shashank.local
Address: 192.168.0.10

Enable Winbind Authentication.

Now execute below command to perform the integration.

root@centos-server /h/shashank# authconfig-tui

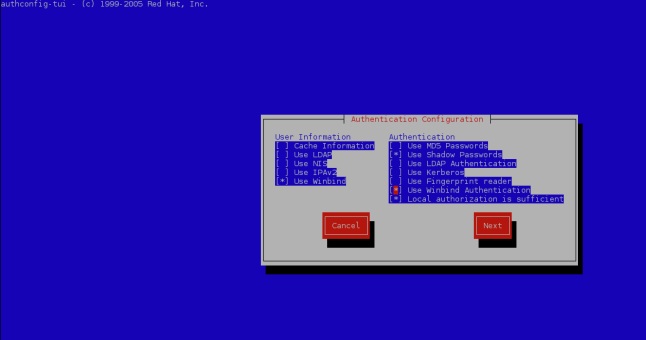
It will bring up a Window like this. Select the options as shown below.

CentOS_-_authconfig-tui.jpg

After you click Next, it will ask you to input properties. Select Security Model as ads, enter Domain as shashank(use your domain here, of-course), Domain Controllers as ad1.shashank.local & ADS Realm as shashank.local. Then choose a default shell for your users. Bash is a good option. Make sure you use your own values here.

Now press the Join Domain button. It will ask you to enter your Domain Controller password.  Enter it & then click OK. If everything goes well, you will see a success message as shown below.

root@centos-server /h/shashank# authconfig-tui
[/usr/bin/net join -w shashank -S ad1.shashank.local -U Administrator]
Enter Administrator's password:<...>

Using short domain name -- SHASHANK
Joined 'CENTOS-SERVER' to dns domain 'shashank.local'

Check if your Linux server can query your AD.

root@centos-server /h/shashank# net ads info
LDAP server: 192.168.0.10
LDAP server name: AD1.shashank.local
Realm: SHASHANK.LOCAL
Bind Path: dc=SHASHANK,dc=LOCAL
LDAP port: 389
Server time: Tue, 13 Feb 2018 10:37:12 IST
KDC server: 192.168.0.10
Server time offset: 0
Last machine account password change: Tue, 13 Feb 2018 10:36:36 IST

Check the list of users obtained from AD.

root@centos-server /h/shashank# wbinfo -u
SHASHANK\administrator
SHASHANK\guest
SHASHANK\admin
SHASHANK\shashank

You can also use below command if you don’t want to use authconfig-tui wizard. This way, you can enable automatic home-directory creation whenever a domain user logs in for the first time.

authconfig --enablewinbind --enablewinbindauth --smbsecurity=ads --smbworkgroup=shashank --smbservers=ad1.shashank.local --smbrealm=SHASHANK.LOCAL --winbindtemplateshell=/bin/bash --enablemkhomedir--updateall
net join -w shashank -S ad1.shashank.local -U Administrator

Now you can login to the Linux server using the AD user.

[shashank@centos-server ~]$ sudo su - SHASHANK\\shashank
Creating home directory for SHASHANK\shashank.
[SHASHANK\shashank@centos-server ~]$ id -a
uid=16777216(SHASHANK\shashank) gid=16777216(SHASHANK\domain users) groups=16777216(SHASHANK\domain users) context=unconfined_u:unconfined_r:unconfined_t:s0-s0:c0.c1023
[SHASHANK\shashank@centos-server ~]$


I hope it was explained in an easy way & you found it useful 🙂

Bash Shell Script to search for textual string inside a specified directory


As a SysAdmin &/or Developer, going through the log files or code is a daily chore. We do it hundreds of times everyday while at work. Some of us do it even when we are not at work 😉

Many a time, we need to search for a particular piece of text/string in either the log-files or the code. There are many text-editors available that you can use to drill into log-files or your code. Some editors also allow you to search inside directories.

But, if you want a simple, command-line utility that does the job for you, I have written a Bash Shell script that allows you to search for your string inside any given directory. It also counts the total occurrences and shows the line-number for those entries.

My script takes care of the OS (Tested on Mac, Ubuntu & RedHat) & performs installation of a small utility called figlet (according the OS)  which I have used to produce an ASCII art for my script. You can press “n” when prompted, if you don’t want to install or use it.

You can download the script from my GitHub gist.

Below is the script in action (executed on Ubuntu).

If you don’t specify a directory, the script exits.

root@shashank-dbserver:/home/shashank/Desktop# ./textinfile.sh

Error!! Please enter absolute path of the directory inside which you want to perform the search. Run this utility as ./textinfile /path/to/directory. Prefix sudo if needed.

Script after specifying a valid directory.

root@shashank-dbserver:/home/shashank/Desktop# ./textinfile.sh /var/log/apache2/

Detecting OS of your machine..

Your OS is : - Ubuntu.

Checking figlet insallation...

This utility requires a package called figlet in order to display a cool ASCII art ;-) Do you want to install it? Its a one time process only. You can safely ignore this insallation. Press y to install or n to cancel.
y
You chose to install figlet. Installing it for your OS now :-)
Reading package lists... Done
Building dependency tree
Reading state information... Done
The following packages were automatically installed and are no longer required:
linux-headers-4.4.0-81 linux-headers-4.4.0-81-generic
linux-image-4.4.0-81-generic linux-image-extra-4.4.0-81-generic
Use 'apt-get autoremove' to remove them.
The following NEW packages will be installed:
figlet
0 upgraded, 1 newly installed, 0 to remove and 0 not upgraded.
Need to get 0 B/190 kB of archives.
After this operation, 744 kB of additional disk space will be used.
Selecting previously unselected package figlet.
(Reading database ... 1548998 files and directories currently installed.)
Preparing to unpack .../figlet_2.2.5-2_amd64.deb ...
Unpacking figlet (2.2.5-2) ...
Processing triggers for man-db (2.6.7.1-1ubuntu1) ...
Setting up figlet (2.2.5-2) ...
update-alternatives: using /usr/bin/figlet-figlet to provide /usr/bin/figlet (figlet) in auto mode
_____ _ ___ _____ _ _
|_ _|____ _| |_|_ _|_ __ | ___(_) | ___
| |/ _ \ \/ / __|| || '_ \| |_ | | |/ _ \
| | __/> <| |_ | || | | | _| | | | __/
|_|\___/_/\_\\__|___|_| |_|_| |_|_|\___|

Welcome to TextInFile! A cute, little utility that allows you to search for the text inside directories from the command-line :-)

Enter the string that you want to search inside /var/log/apache2/...GET /static/4d441666/scripts/yui/menu/assets/skins/sam/menu.css HTTP/1.1

Searching for GET /static/4d441666/scripts/yui/menu/assets/skins/sam/menu.css HTTP/1.1 in /var/log/apache2/...

GET /static/4d441666/scripts/yui/menu/assets/skins/sam/menu.css HTTP/1.1 was found 2 time(s) inside /var/log/apache2/.

Below is your Search Result :-)

/var/log/apache2/access_reverse_proxy.log.1:7:192.168.0.50 - - [25/Jun/2017:05:35:51 +0200] "GET /static/4d441666/scripts/yui/menu/assets/skins/sam/menu.css HTTP/1.1" 200 1654 "http://192.168.0.51/" "Mozilla/5.0 (X11; Linux x86_64) AppleWebKit/537.36 (KHTML, like Gecko) Chrome/59.0.3071.104 Safari/537.36"
/var/log/apache2/access_reverse_proxy.log.1:2807:10.0.2.2 - - [27/Jun/2017:03:44:31 +0200] "GET /static/4d441666/scripts/yui/menu/assets/skins/sam/menu.css HTTP/1.1" 200 1654 "http://localhost:8000/" "Mozilla/5.0 (Macintosh; Intel Mac OS X 10_12_5) AppleWebKit/537.36 (KHTML, like Gecko) Chrome/58.0.3029.110 Safari/537.36"

This utility took 84 seconds to run(including the time you took to type/paste your string).

That's all folks! Hope you liked TextInFile ;-)

If you provide an incorrect directory, the script shows an appropriate error & then exits.

root@shashank-dbserver:/home/shashank/Desktop# ./textinfile.sh /var/log/apache

The directory /var/log/apache that you specified does't exist. Please choose the correct directory.

Setup an Apache Reverse Proxy Server on Ubuntu 14.04


In my last post, I demonstrated how we can set up an Apache Forward Proxy Server on Ubuntu 14.04. So, this post will talk about everything you need to set up an Apache Reverse Proxy Server.

Difference between Forward and Reverse Proxy.

Before I start this tutorial, we must first understand the difference between Forward and Reverse Proxy. Since my blog is all about simple explanation, I will keep things simple & informative 🙂

Forward Proxy server is your more obvious kind of proxy where you access a remote server, like Google or Facebook or another remote server in your network such as Jenkins, via a proxy server. It means, data packets flow like this.

Client(aka you) –> Forward Proxy server –> Remote server(aka Google).

Forward implies that your proxy server sits in front of your remote server. You need to configure your client to use Forward Proxy server. Your remote server will see IP of your proxy server & knows nothing about client’s existence.

Reverse Proxy is a different concept. Here you also access your remote server via a proxy server but you don’t specify IP or hostname of your remote server. You enter IP/hostname of your Reverse proxy server which redirects your request to the remote server, based on its configuration. Data packets flow in the similar manner, but you only invoke your Reverse Proxy server here as opposed to invoking your remote server.

Suppose you have a Jenkins server running on port 8080. You want to access this server but you don’t want to expose its port. You setup an Apache Reverse Proxy Server & tell it to redirect all requests landing on port 80 (Apache’s default) to Jenkins server which is running on port 8080. Since its default port, you just enter IP/hostname of your Reverse Proxy server in your browser & you will end up seeing Jenkins GUI 😉 You don’t need to configure any client at all here because you are entering Reverse Proxy server’s IP/hostname only.

Armed with some information, lets begin this tutorial 🙂

Lab Description : –

  • Reverse Proxy Server – An Ubuntu 14.04 Server running Apache with IP 192.168.0.51
  • Client  – An Ubuntu 14.04 Server with IP 192.168.0.50
  • Remote Server – An Ubuntu 14.04 Server with IP 192.168.0.50. This server runs my Jenkins, so I will be accessing Jenkins from my client via proxy server. Note that I am using same host for client & remote server. This is because my request will go to Reverse Proxy Server only & it will redirect that request to Jenkins which runs on the same host.

Steps to Perform : –

Configure Reverse Proxy Server (192.168.0.51).

1. Install core product.

Install Apache, if not already done. It is as simple as issuing –

root@shashank-reverse-proxy-server:/home/shashank# apt-get install-y apache2 apache2-doc apache2-utils

2. Install necessary modules.

Issue below command to install modules required for proxy server.

root@shashank-reverse-proxy-server:/home/shashank# apt-get install libapache2-mod-proxy-html libxml2-dev

3. Enable Apache modules.

Issue below command to enable all the required Apache modules.

root@shashank-reverse-proxy-server:/home/shashank# a2enmod proxy proxy_ajp proxy_http rewrite deflate headers proxy_balancer proxy_connect proxy_html

4. Configure proxy configuration file.

We will now create an Apache proxy configuration file that will hold information required for proxying. Start with creating a file like this.

root@shashank-reverse-proxy-server:/home/shashank# vim /etc/apache2/mods-available/mod_reverse_proxy.conf

Please check my GitHub gist to see the contents of this file. HTML tags are interfering with the tags in configuration file. You can see that nothing much is happening here except enabling the proxy.

If you want to run Apache on its default port, its alright. Otherwise you may wish to edit /etc/apache2/ports.conf file. Whatever port you define here will be used to access your remote server in the form of IP/hostname of Reverse Proxy server:port#.

5. Define a Virtual Host.

Its now time to define a Virtual Host which is a separate instance of your web-server(remember you can host multiple sites on a single Apache server). We are defining it to enable more fine-grained logs & redirection for remote server. Start with backing up the original default Virtual Host.

root@shashank-reverse-proxy-server:/home/shashank# cp -p /etc/apache2/sites-available/000-default.conf /etc/apache2/sites-available/000-default.conf.orig

Now rename 000-default.conf to apache_reverse_proxy.conf to avoid confusion.

Now edit this /etc/apache2/sites-available/apache_reverse_proxy.conf file to define logs location & port. You can see that I am redirecting all incoming HTTP requests to my remote Jenkins server which is running on port 8080.

Please check my GitHub gist to see the contents of this file.

6. Enable the Virtual Host.

Time to enable our newly created Virtual Host.

root@shashank-reverse-proxy-server:/home/shashank# a2ensite apache_reverse_proxy.conf 
Enabling site reverse-proxy. To activate the new configuration, you need to run: service apache2 reload root@shashank-reverse-proxy-server:/home/shashank# service apache2 reload * Reloading web server apache2 *

7. Restart Apache.

Configuration is now done & we must restart Apache to load these new settings.

If everything is configured correctly, you will now have a working Reverse Proxy Server.

To test it, log on to your client server 192.168.0.50 & open your browser. Now enter just the IP address of your Reverse Proxy server 192.168.0.51. You will see Jenkins GUI 🙂 Since I am running Apache on its default port 80, I only used 192.168.0.51. If it was running on some other port, I would have used 192.168.0.51:port#. See the screenshot below to see Reverse Proxy in action 😉

Jenkins_behind_Reverse_Proxy_server.png

If you stop Apache service & retry opening Jenkins, you will see that its not loading & asks you to check Proxy configuration 😉

As always, you are most welcome if you have suggestions/feedback or you need more information 🙂

How To Setup An Apache Forward Proxy Server on Ubuntu 14.04


Introduction : –

A Forward Proxy Server is a server that sits between you, aka client, and your remote server. Lets put it in a simple way 🙂

Let’s say you want to access Facebook from your laptop using your favorite browser. Your browser is the client here. Facebook obviously runs on a server 😉 Now, all HTTP requests made from your browser to Facebook will contain your laptop’s IP address as well. But you don’t want your IP address to be tracked. What you will do now?

Yes, the answer is setting up a Forward Proxy Server. This proxy server will sit between you & Facebook server. Whatever HTTP requests your browser will initiate will be relayed/proxied via this proxy server. Data packets flow like this. Your laptop –> proxy server –> Facebook server.

It means Facebook will see that the request came from the proxy server & it will never know that it actually originated from your laptop.

It is just a simple explanation of Forward Proxy Server. There are many other uses & explanations. But I tend to keep things simple 😉

Lab Description : –

  • Forward Proxy Server – An Ubuntu 14.04 Server running Apache with IP 192.168.0.62
  • Client  – An Ubuntu 14.04 Server with IP 192.168.0.51
  • Remote Server : – An Ubuntu 14.04 Server with IP 192.168.0.50. This server runs Jenkins so I will be accessing Jenkins from my client via the proxy server.

Steps to Perform : –

Configure Forward Proxy Server.

1. Install core product.

Install Apache, if not already done. It is as simple as issuing –

root@shashank-forward-proxy-server:/home/shashank# apt-get install-y apache2 apache2-doc apache2-utils

2. Install the necessary modules.

Issue below command to install modules required for proxy server.

root@shashank-forward-proxy-server:/home/shashank# apt-get install libapache2-mod-proxy-html libxml2-dev

3. Enable Apache modules.

Issue below command to enable all the required Apache modules.

root@shashank-forward-proxy-server:/home/shashank# a2enmod proxy proxy_ajp proxy_http rewrite deflate headers proxy_balancer proxy_connect proxy_html

4. Configure proxy configuration file.

We will now create an Apache proxy configuration file that will hold information required for proxying. Start with creating a file like this.

root@shashank-forward-proxy-server:/home/shashank# vim /etc/apache2/mods-available/proxy.conf

Please check my GitHub gist to see the contents of this file. HTML tags are interfering with the tags in the configuration file. You can see that nothing much is happening here except enabling the proxy.

5. Define port for proxy server.

Now we need to define the port on which our proxy server must run. Issue this command after backing up the original file.

root@shashank-forward-proxy-server:/home/shashank# sed -i -e 's/80/8889/g' /etc/apache2/ports.conf

You can see that I have replaced default port 80 with 8889. Choose any port that you like & is available.

6. Define a Virtual Host.

It is now time to define a Virtual Host which is a separate instance of your web-server(remember you can host multiple sites on a single Apache server). We are defining it to enable more fine-grained logs & port. Start with backing up the original default Virtual Host.

root@shashank-forward-proxy-server:/home/shashank# cp -p /etc/apache2/sites-enabled/000-default.conf /etc/apache2/sites-enabled/000-default.conf.orig

Now edit this /etc/apache2/sites-enabled/000-default.conf file to define logs location & the port. Here, I am running it on the same port 8889 as this is my only instance.

Please check my GitHub gist to see the contents of this file.

As you can see, we have defined the location for logs specific to the proxy server.

7. Enable the Virtual Host.

Time to enable our newly created Virtual Host.

root@shashank-forward-proxy-server:/home/shashank# a2ensite 000-default.conf

8. Restart Apache.

Configuration is now complete & we must restart Apache to load these new settings.

root@shashank-forward-proxy-server:/home/shashank# service apache2 restart
 * Restarting web server apache2 [Fri Jun 23 09:09:32.982307 2017] [proxy_html:notice] [pid 2940:tid 140143966525312] AH01425: I18n support in mod_proxy_html requires mod_xml2enc. Without it, non-ASCII characters in proxied pages are likely to display incorrectly.
AH00558: apache2: Could not reliably determine the server's fully qualified domain name, using node2.shashank.com. Set the 'ServerName' directive globally to suppress this message

With a success message, you are confident that your Apache configuration is correct 🙂 Above is just a warning & not an error, so no need to worry 😉

Let us move on to client-side configuration.

Client Side Configuration : –

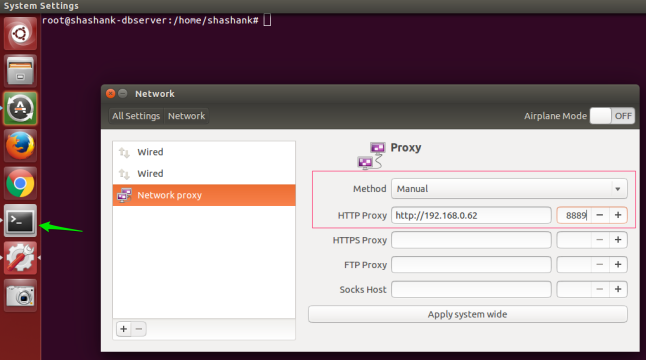
With a working Apache Forward Proxy Server configuration, let us move on to our client machine & configure it to use our proxy server. For this, log-in to the machine & go to System Settings. Then select Network & then Proxy.

Enter your HTTP proxy server IP or FQDN or hostname & the port. Remember we configured our proxy server to run on port 8889.

Configuring_Client_to_use_Apache_Forward_Proxy_Server-Shashank_Srivastava.png

Test your proxy connections.

You are all set now 🙂 Time to test the settings. Lets now open our browser & try to access Facebook & also Jenkins on a remote server (IP 192.168.0.50. See Introduction) in the same network. If your configuration is correct, you will be able to browse Facebook or the internet without any issue. You will also be able to access your Jenkins server. You can check your proxy in action in below logs. Remember we had configured log location in step # 6 above. You need to log-in to your proxy server & check the log file which happens to be /var/log/apache2/access_forward_proxy.log . If your location is different, make sure you check that file.

You can see that requests made from client 192.168.0.51 to remote server 192.168.0.50 are proxying through our proxy server.

192.168.0.51 - - [23/Jun/2017:09:33:17 +0530] "GET http://192.168.0.50:8080/static/50cbf35e/images/16x16/warning.png HTTP/1.1" 200 761 "http://192.168.0.50:8080/static/50cbf35e/css/style.css" "Mozilla/5.0 (X11; Linux x86_64) AppleWebKit/537.36 (KHTML, like Gecko) Chrome/59.0.3071.86 Safari/537.36"
192.168.0.51 - - [23/Jun/2017:09:33:17 +0530] "GET http://192.168.0.50:8080/static/50cbf35e/images/16x16/error.png HTTP/1.1" 200 817 "http://192.168.0.50:8080/static/50cbf35e/css/style.css" "Mozilla/5.0 (X11; Linux x86_64) AppleWebKit/537.36 (KHTML, like Gecko) Chrome/59.0.3071.86 Safari/537.36"
192.168.0.51 - - [23/Jun/2017:09:33:17 +0530] "GET http://192.168.0.50:8080/static/50cbf35e/images/top-sticker-bottom-edge.png HTTP/1.1" 200 605 "http://192.168.0.50:8080/static/50cbf35e/css/style.css" "Mozilla/5.0 (X11; Linux x86_64) AppleWebKit/537.36 (KHTML, like Gecko) Chrome/59.0.3071.86 Safari/537.36"
192.168.0.51 - - [23/Jun/2017:09:33:03 +0530] "CONNECT fonts.gstatic.com:443 HTTP/1.1" 200 4806 "-" "Mozilla/5.0 (X11; Linux x86_64) AppleWebKit/537.36 (KHTML, like Gecko) Chrome/59.0.3071.86 Safari/537.36"
192.168.0.51 - - [23/Jun/2017:09:33:17 +0530] "GET http://192.168.0.50:8080/opensearch.xml HTTP/1.1" 200 6997 "-" "Mozilla/5.0 (X11; Linux x86_64) AppleWebKit/537.36 (KHTML, like Gecko) Chrome/59.0.3071.86 Safari/537.36"

I hope you found this post interesting, informative & easy 🙂 Do let me know if it needs improvements or you have suggestions 🙂

Bash Shell Script To Create A Rich, Colorful Server Health Report(in HTML)


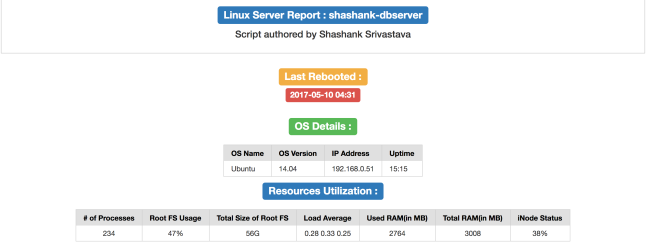
As you know,  my previous shell script produces an HTML Server Health Report displaying all vital stats in a plain format & I thought its magical to have a shell script create an HTML report even though it was a rather simple looking report 😉 Then I wrote a web-app that helps you track how much money you have saved & came up with the idea to enhance my script to output a rich, vibrant, vividly colored HTML report that has interactive 3D charts & other colorful visual elements 🙂 Sneak a peek below!

You can grab the script from my GitHub gist page.

Server-Health-Report-Shashank_Srivastava.png

So, I modified my script & made it fetch more server data and display that data in different tables & panels. These tables & panels include : –

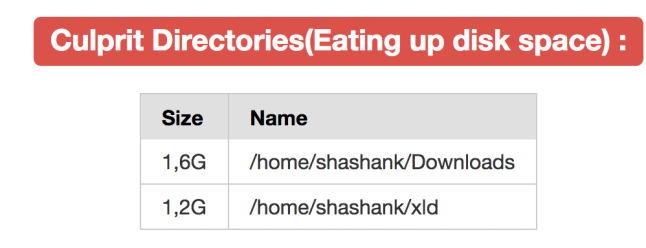
Directories that eat up most of your disk space.

Server-Health-Report-Shashank_Srivastava.png

Dynamic table showing the directories that take up most of your disk-space.

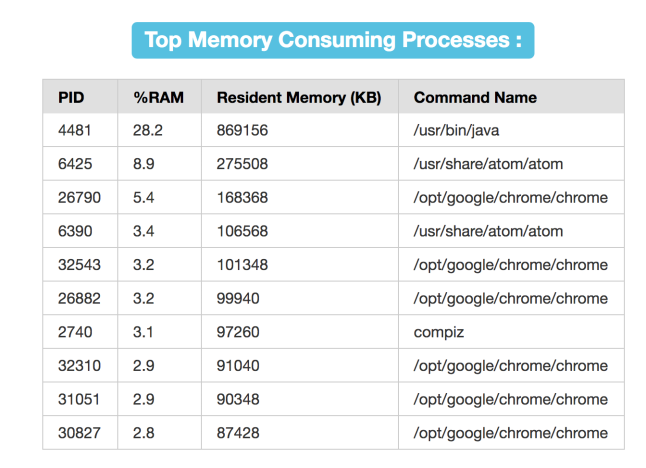
Top Memory consuming processes.

Server-Health-Report-Shashank_Srivastava.png

Dynamic table displaying Top Memory consuming processes.

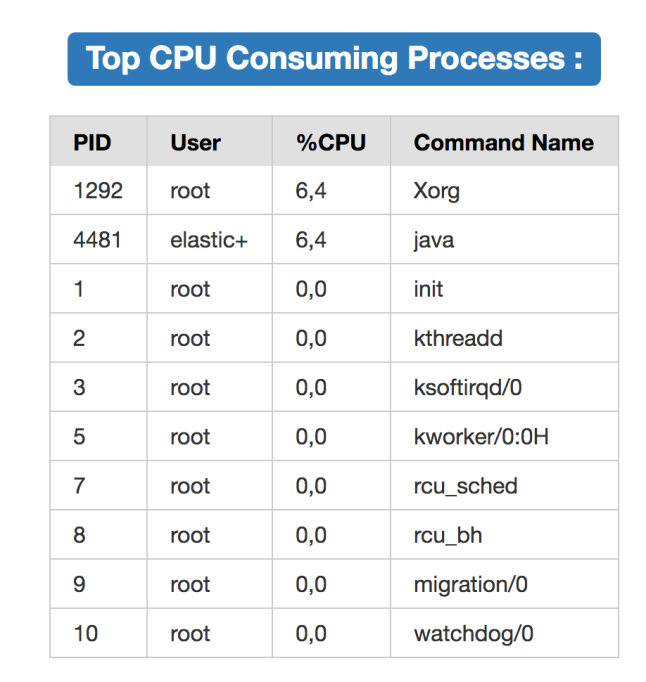
Top CPU consuming processes.

Server-Health-Report-Shashank_Srivastava.png

Dynamic table displaying Top CPU consuming processes.

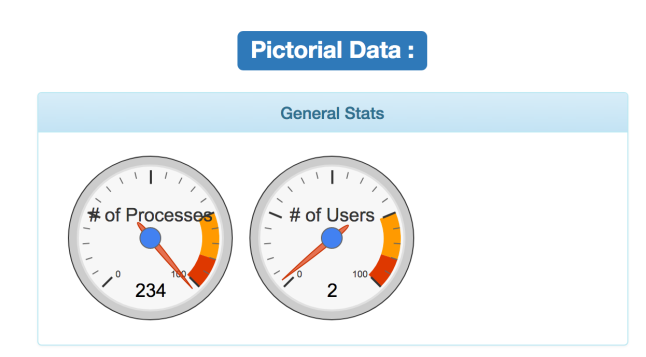
2 Speedometers displaying # of processes running & # of logged in users.

Server-Health-Report-Shashank_Srivastava.png

Speedometer 🙂

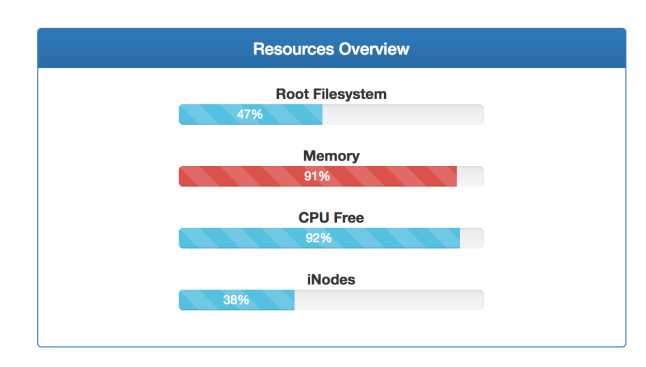
A bars system that displays the resources utilisation (RAM/CPU/Filesystem/INodes) & these bars change their color to red if threshold is crossed 🙂

Server-Health-Report-Shashank_Srivastava.png

Bars displaying vital system stats.

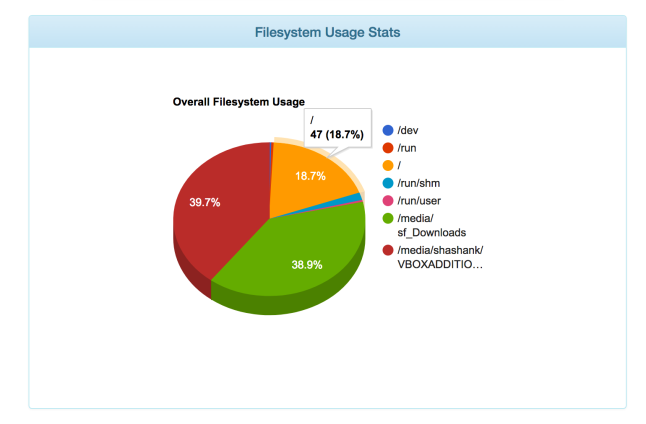
3D interactive pie-chart showing the break-up of filesystem utilisation.

Server-Health-Report-Shashank_Srivastava.png

3D chart with break-up of filesystem usage.

How To Receive Emails From Your PHP OpenShift Application Using Swift Mailer & GMail


There are times when we need emails to be sent/received from our PHP applications hosted on OpenShift. My particular example is based on a feedback form that I have put on my own PHP based web-application hosted on OpenShift http://www.howmuchisaved.in. Using this form, I can receive email whenever users submit their feedback to me. If your applications is hosted on your own server, you can easily setup Postfix to start receiving mails but things start to get tricky when you have little to no control on the web-server which runs your application. OpenShift doesn’t allow you to configure Postfix or any such utilities. It even doesn’t give you root access to install & configure dependencies. So, you are left with very little options. And this is where Swift Mailer comes to rescue. In this tutorial I will explain how you can leverage Swift Mailer PHP library to be able to receive mails. Please note that this tutorial can be followed for other restrictive hosting solutions as well.

Requirements : –

For this tutorial, you will need one GMail account (more on it below) & one PHP application hosted on OpenShift or any cloud platform.

Steps to be performed : –

Configure Google Security settings

Since we are using GMail as our SMTP, all emails will be delivered/relayed via smtp.gmail.com. By default, Google doesn’t allow less-secure apps (such as your OpenShift app) to access your account. So, go to https://www.google.com/settings/security/lesssecureapps and turn it on. Its better to create a new Google account & turn this setting on for that particular account. Choice is yours, so act accordingly.

Download Swift Mailer PHP Library

Download it from here https://github.com/swiftmailer/swiftmailer & place it inside your project directory.

Or if you have git installed on your machine, you can always use git clone https://github.com/swiftmailer/swiftmailer inside your project directory. This will create a new directory inside your project. Rename it so that its easy to reference Swift Mailer inside your code. I renamed mine as swiftmailer.

Edit PHP code

Now, with Swift Mailer library in place, edit your PHP script that handles e-mail functionality. Below is the sample code snippet from my GitHub repository’s file.

https://github.com/shashank-ssriva/HowMuchISaved/blob/openshift-version/howmuchisaved/send_feedback_mail.php

You may fork or download my entire project if you so wish 🙂 This version is fully functional and is already hosted on OpenShift (as told in introduction above).

require_once 'swiftmailer/lib/swift_required.php';
      //allow less secured app in Gmail settings for this to work.
      //Also use port 465 and ssl if it doesn't work.
      $transport = Swift_SmtpTransport::newInstance('smtp.gmail.com', 587, "tls")
      ->setUsername('your gmail username')
      ->setPassword('your gmail password');

You can see in the snippet above how you need to organise your Swift Mailer directory. You also need to enter your GMail credentials there.

Test your application

After making changes to the code, fire up your application in a browser & check if you received email from this page or not. Please note the line #22 in above
script. It mentions the email-address where you will be receiving e-mails from your application. Change this to yours if not already done.

That’s it 🙂 If everything has been configured correctly, you will start to receive e-mails from this application. You may use my repository for fully functional application & its code.

Host a PHP/MySQL Application/Dynamic Website on RedHat OpenShift


I had no idea that I can host my PHP/MySQL based application on OpenShift for free until I had to do some work on it a few weeks back. While working on some Automation with OpenShift, I came up with the idea to host my own app on it 😉

If you have a small PHP application or some dynamic PHP based website that you want to host on OpenShift for free, please read on.

So, here is how to do it.

Go to OpenShift Console

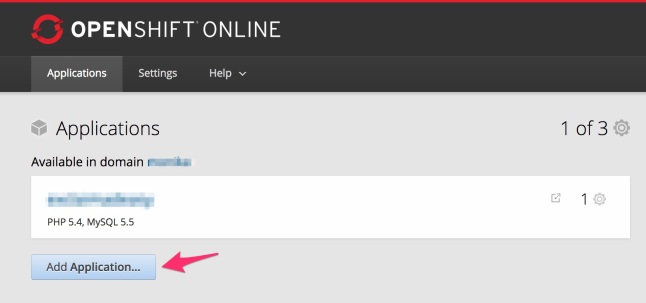
Login to your OpenShift account & go to console https://openshift.redhat.com/app/console/applications. You will see a button called “Add Application” like below. Click on it.

Applications___OpenShift_Online_by_Red_Hat.jpg

Choose PHP

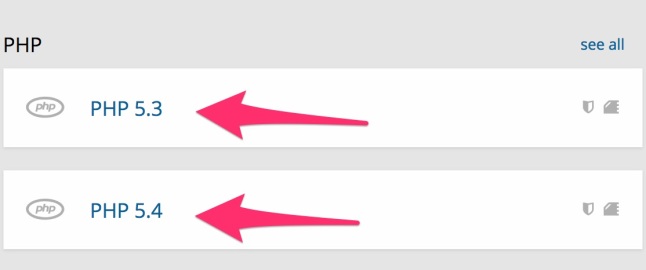
Choose any of the PHP versions.

Create_a_New_Application___OpenShift_Online_by_Red_Hat.jpg

Enter a Public URL

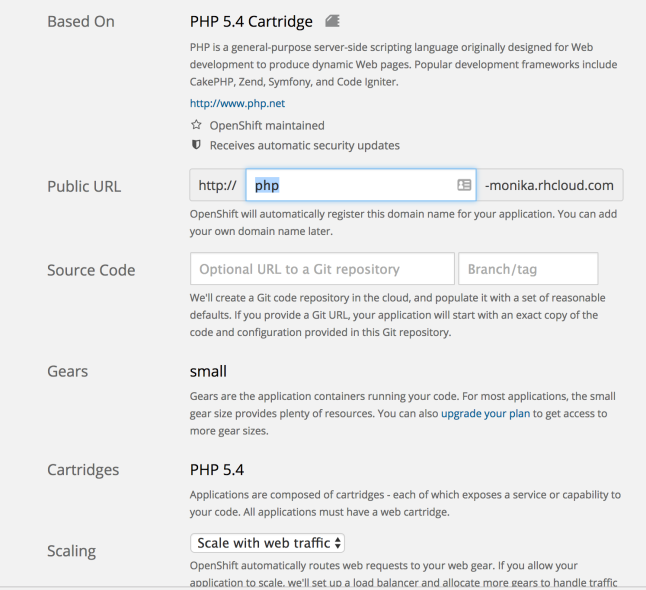
Use a unique URL for your application. If you have not created a domain earlier, create one before this step.

Create_a_New_Application___OpenShift_Online_by_Red_Hat.png

Choose Scaling

If you want an HAProxy Loadbalancing, choose Scale with web-traffic as seen above. Please bear in mind that if your application is based on MySQL or any other Database, don’t scale it and go with default. Otherwise you will need to use HAProxy server’s IP or FQDN in your code for database connection string.

Choose Region

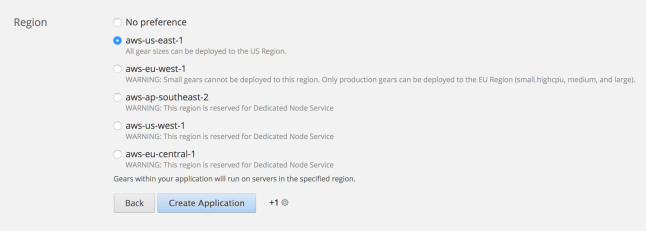
Free tier of OpenShift doesn’t allow to choose anything except first 2 options.

Create_a_New_Application___OpenShift_Online_by_Red_Hat.png

Create Application

Click “Create Application” button to create your application. This may take a few minutes.

Get_Started___OpenShift_Online_by_Red_Hat.png

Install Git client for your OS

Install Git client by following instructions shown there on the screen. Also, make note of the git clone command. Using these details, you will clone a repository from OpenShift to your machine. From this repository, you can push to OpenShift after making changes to code. Follow the instructions you see after clicking “Create Application” button.

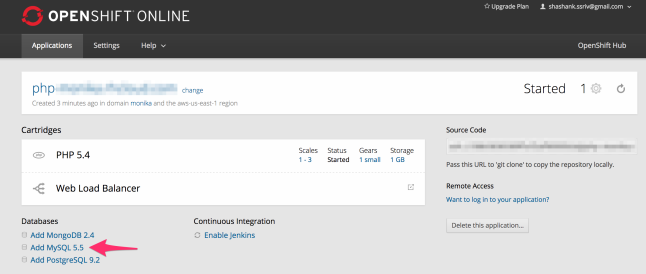
Add Database gear

Add any of the Database gears. I have personally chosen MySQL 5.5. Make note of the details like database user & password. You will have to use these values in your code.

php___OpenShift_Online_by_Red_Hat.png

Push/Publish Code

Add your code project to this repository (created above). Edit your database connection string in code using the values you got from last step. Then run below commands to push it to OpenShift & restart Apache there. Whenever you make changes to code or add a new file/directory to your local repository, don’t forget to follow below steps.

git add .

git commit -am "adding project data"

git push

You are done 🙂 You will see your application/site hosted on OpenShift now 🙂

I hope you liked this post. Catch you soon with another post!

Install & Setup SonarQube on Ubuntu for Code Analysis


SonarQube is a Code Quality testing solution which lets you analyse the quality of your code, detect bugs and much more to improve the overall health of your code.

SonarQube comes in 2 variants. It can be accessed online (read cloud-based) using the URL https://sonarqube.com/ and it can also be hosted on your own server. In this tutorial, I am demonstrating how you can install & setup SonarQube on your own Ubuntu server to check your code’s quality 🙂

Let’s start!

Lab Description : –

  • Ubuntu 14.04 64 bit server with 2 GB RAM.
  • MySQL version 5.6.33 with InnoDB storage engine.
  • SonarQube version 6.2.
  • My PHP project located at DocumentRoot. You can choose any location for code analysis.

Please note that SonarQube needs at least 2 GB of RAM, so please make sure you have enough of it.

Steps to be followed : –

SonarQube by default uses its internal H2 database but we will be using MySQL for this. Choose any database of your choice.

1. Download SonarQube & SonarQube Scanner.

Use the links provided to download both the products.

2. Unpack them.

Unpack both of them to any location where you can locate them easily. I chose my home-directory for it. It will create 2 directories sonarqube-6.2 & sonar-scanner-2.8.

root@shashank-dbserver:/home/shashank# unzip Downloads/sonarqube-6.2.zip

root@shashank-dbserver:/home/shashank# unzip Downloads/sonar-scanner-2.8.zip

It will be good if you create aliases for above 2 directories or add them to your PATH.

3. Create MySQL Database & User.

Create a new database called sonar in MySQL (or any other DBMS of your choice). Then create a user sonarqube & grant it all privileges for sonar database.

mysql> create database sonar;
Query OK, 1 row affected (0,01 sec)

mysql> use sonar;
Database changed
mysql> CREATE USER 'sonarqube'@'localhost' IDENTIFIED BY 'sonarqube';
Query OK, 0 rows affected (0,02 sec)

mysql> GRANT ALL PRIVILEGES ON sonar.* to 'sonarqube'@'localhost';
Query OK, 0 rows affected (0,00 sec)

mysql> flush privileges;
Query OK, 0 rows affected (0,00 sec)

4. Edit sonar.properties file.

Edit this file inside sonarqube-6.2/conf directory to enter database details. Make sure to put user-name & password you created in the last step. Below is the snippet. Edit values accordingly.

# DATABASE
#
# IMPORTANT: the embedded H2 database is used by default. It is recommended for tests but not for
# production use. Supported databases are MySQL, Oracle, PostgreSQL and Microsoft SQLServer.

# User credentials.
# Permissions to create tables, indices and triggers must be granted to JDBC user.
# The schema must be created first.
sonar.jdbc.username=sonarqube
sonar.jdbc.password=sonarqube

#----- Embedded Database (default)
# H2 embedded database server listening port, defaults to 9092
#sonar.embeddedDatabase.port=9092
#----- MySQL 5.6 or greater
# Only InnoDB storage engine is supported (not myISAM).
# Only the bundled driver is supported. It can not be changed.
sonar.jdbc.url=jdbc:mysql://localhost:3306/sonar?useUnicode=true&characterEncoding=utf8&rewriteBatchedStatements=true&useConfigs=maxPerformance

5. Create & Edit sonar-project.properties file.

Create this file inside your code’s project & enter values accordingly. See below snippet. Give your project a unique Project Key for SonarQube to uniquely identify it.

# must be unique in a given SonarQube instance
sonar.projectKey=exclaimadeasy
# this is the name and version displayed in the SonarQube UI. Was mandatory prior to SonarQube 6.1.
sonar.projectName=ExClaiMadEasy
sonar.projectVersion=1.0

# Path is relative to the sonar-project.properties file. Replace "\" by "/" on Windows.
# Since SonarQube 4.2, this property is optional if sonar.modules is set.
# If not set, SonarQube starts looking for source code from the directory containing
# the sonar-project.properties file.
sonar.sources=.

# Encoding of the source code. Default is default system encoding
#sonar.sourceEncoding=UTF-8

6. Start SonarQube.

Start it by executing sonarqube-6.2/bin/sonar.sh start command.

root@shashank-dbserver:/home/shashank/sonarqube-6.2/bin/linux-x86-64# ./sonar.sh start
Starting SonarQube...
Started SonarQube.

7. Access SonarQube via a browser.

Open your browser & enter localhost:9000. Then click login at the top-right corner. Credentials are admin/admin.

8. Start SonarQube Scanner to analyse your code.

Execute below command to start SonarQube scanner from within your project directory.

root@shashank-dbserver:/var/www/bills/html/CabBIlls# /home/shashank/sonar-scanner-2.8/bin/sonar-scanner

It will start scanning your project’s code. Once it is done scanning, you will see output similar to below. Click the link provided there to see your report.

INFO: Analysis report uploaded in 240ms
INFO: ANALYSIS SUCCESSFUL, you can browse http://localhost:9000/dashboard/index/exclaimadeasy
INFO: Note that you will be able to access the updated dashboard once the server has processed the submitted analysis report
INFO: More about the report processing at http://localhost:9000/api/ce/task?id=AVqskPfd6DjWymbXBiOQ
INFO: Task total time: 18.806 s
INFO: ------------------------------------------------------------------------
INFO: EXECUTION SUCCESS
INFO: ------------------------------------------------------------------------

Video Tutorial : –

I have also posted a video on my YouTube channel to demonstrate all the steps. You can watch it below.

Caveats : –

The video shown above only demonstrates the basic code analysis, even though my project is PHP based. For PHP projects (or any other non-default languages), please download the appropriate plugin(s) and place tht in SonarQube_HOME/extensions/plugins directory. After that, restart SonarQube by executing sonar.sh restart command.

PHP plugin can be downloaded from https://docs.sonarqube.org/display/PLUG/SonarPHP

Also, in the video above, I missed to uncomment MySQL jdbc conncection URL but same can be seen uncommented in the snippet I pasted in step 3 😉

I hope you liked this post. See you later 🙂

Create a Server Health Report (HTML) Using Shell Script


Shell scripts are insanely powerful & convenient. We all know it 😉 Much of the beauty in shell scripts lies in the way they can be used to automate many aspects of System Administration. As a SysAdmin, you might have been asked to prepare health-reports on a regular basis. Today, I wrote one such script that will generate an HTML health-report containing some vital system information. Lets see how it works 🙂

Lab Description : –

Ubuntu 14.04 Server. Environment : – Bash shell

Instructions : –

Download or clone my GitHub repository from below location.

https://github.com/shashank-ssriva/Linux-Server-HTML-Health-Report-Using-Shell-Script

Place the syshealth.sh file anywhere you want. I prefer keeping it under my home-directory but you may keep it anywhere.

Make it executable (if not already).

You may either run/execute it manually or you may also put it in a CRON job. I have chosen to generate the report twice a day, but its entirely upto you 🙂

Video Tutorial : –

To see the script in action, watch the video below on my YouTube Channel.

Additional Notes : –

I have kept the script & report minimal since I wrote it today only. You may customize it further so as to suit your needs. Sky is the limit 😉