Introduction
There are times when you need to integrate your Linux servers with Active Directory so as to allow authentication from that along-with local authentication. What it essentially means is that not only can you log in locally to this Linux server, you can also create users on your Active Directory & login with those users here as well.
This post explains how you can integrate your CentOS 7 server with Active Directory. Let’s get started 🙂
Lab Description : –
Domain Controller : – A Windows 2012 Server running with IP 192.168.0.10 & FQDN ad1.shashank.local.
Client machine : – A CentOS 7 server with the IP 192.168.0.65.
Active Directory Domain : – shashank
Client Configuration : –
Install necessary packages.
root@centos-server /h/shashank# yum install samba-winbind samba-winbind-clients pam_krb5 nscd
Configure DNS Server.
Edit your /etc/resolv.conf & add a line for your Domain Controller.
nameserver 192.168.0.10
Check connectivity for the Domain Controller.
root@centos-server /h/shashank# nslookup ad1.shashank.local
Server: 192.168.0.10
Address: 192.168.0.10#53

Name:ad1.shashank.local
Address: 192.168.0.10
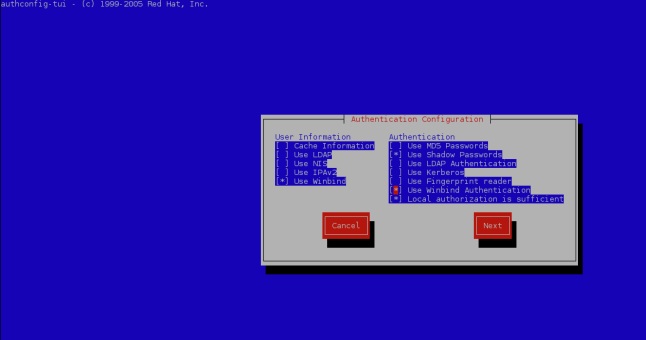
Enable Winbind Authentication.
Now execute below command to perform the integration.
root@centos-server /h/shashank# authconfig-tui
It will bring up a Window like this. Select the options as shown below.
After you click Next, it will ask you to input properties. Select Security Model as ads, enter Domain as shashank(use your domain here, of-course), Domain Controllers as ad1.shashank.local & ADS Realm as shashank.local. Then choose a default shell for your users. Bash is a good option. Make sure you use your own values here.
Now press the Join Domain button. It will ask you to enter your Domain Controller password. Enter it & then click OK. If everything goes well, you will see a success message as shown below.
root@centos-server /h/shashank# authconfig-tui
[/usr/bin/net join -w shashank -S ad1.shashank.local -U Administrator]
Enter Administrator's password:<...>

Using short domain name -- SHASHANK
Joined 'CENTOS-SERVER' to dns domain 'shashank.local'
Check if your Linux server can query your AD.
root@centos-server /h/shashank# net ads info
LDAP server: 192.168.0.10
LDAP server name: AD1.shashank.local
Realm: SHASHANK.LOCAL
Bind Path: dc=SHASHANK,dc=LOCAL
LDAP port: 389
Server time: Tue, 13 Feb 2018 10:37:12 IST
KDC server: 192.168.0.10
Server time offset: 0
Last machine account password change: Tue, 13 Feb 2018 10:36:36 IST
Check the list of users obtained from AD.
root@centos-server /h/shashank# wbinfo -u
SHASHANK\administrator
SHASHANK\guest
SHASHANK\admin
SHASHANK\shashank
You can also use below command if you don’t want to use authconfig-tui wizard. This way, you can enable automatic home-directory creation whenever a domain user logs in for the first time.
authconfig --enablewinbind --enablewinbindauth --smbsecurity=ads --smbworkgroup=shashank --smbservers=ad1.shashank.local --smbrealm=SHASHANK.LOCAL --winbindtemplateshell=/bin/bash --enablemkhomedir--updateall
net join -w shashank -S ad1.shashank.local -U Administrator
Now you can login to the Linux server using the AD user.
[shashank@centos-server ~]$ sudo su - SHASHANK\\shashank
Creating home directory for SHASHANK\shashank.
[SHASHANK\shashank@centos-server ~]$ id -a
uid=16777216(SHASHANK\shashank) gid=16777216(SHASHANK\domain users) groups=16777216(SHASHANK\domain users) context=unconfined_u:unconfined_r:unconfined_t:s0-s0:c0.c1023
[SHASHANK\shashank@centos-server ~]$
I hope it was explained in an easy way & you found it useful 🙂
